Adding a New Place
In many cases, your program was deployed with your custom list of "places" (rooms, sites, etc.) already established. However, if you want to create layouts or diagrams in additional "places" you can add them yourself in the Places Library.
- Click or tap the Place Library sidebar option
 on the left-hand side of your screen.
Result: The Placez Library screen opens, listing details of all venues currently in your program.
Note: You can click/tap any venue in this list and view the bar graphs to the right to see how many times a venue has been booked and how many guests or how much revenue it has brought in.
- Click/tap the Add New Place button
 , located toward the upper right-hand side of your screen, to add a new place to your Placez Library.
Result: The Place Details screen opens for you to enter details of a new venue. - Type the name of the new place into the Place Name field.
- Fill out the remaining details (Location, Type, etc.) as desired.
Note: See Editing Picklists for information on customizing the Type drop-down list. - [Optional] Click/tap the Modify Image button, located toward the middle of the Place Details screen, to browse to a stored image to associate with your place. (See the section below, "Adding or Changing a Place Image.")
- Click/tap the Save button to save your changes.
Note: Click/tap the Cancel button to cancel any changes you made to the record since your last Save.
- [Optional] Add a floorplan to your place by following the steps under Creating Your Floor Plan.
Note: You cannot create a layout or diagram for a place that does not have at least one floorplan. Therefore, by default a 30' x 30' square plan is automatically created for each new place.
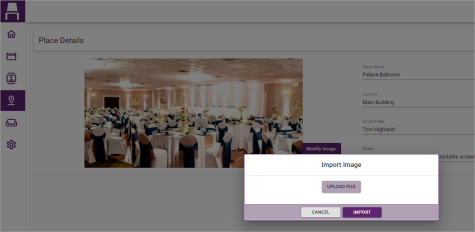
- Click/tap the Modify Image button, located at the bottom right of the Image area, on the Place Details screen.
Result: The Import Image window opens.
- Click/tap the Upload File button.
Result: A browse window opens. - Browse your way to a stored image.
- Double-click/double-tap the image to select it.
Result: The Import Image window opens. - Click/tap the Import button.
- Click/tap Save, on the Place Details screen, to save the new image.
- Click or tap the Place Library sidebar option
 on the left-hand side of your screen.
Result: The Placez Library screen opens. - Select the place you would like to edit.
Note: Search for the place name by typing the name of the desired place into the incremental Search field, located on the upper left-hand side of your screen.
Tip: Sort the data grids in your Placez Library by clicking/tapping a column heading. Records will be sorted in ascending order by that detail. Click/tap the column heading again to sort the column in descending order.
- Click/tap the purple Go To symbol
 , located on the right-hand side of the selected record.
Result: The Place Details screen displays. - Click/tap the Switch to Edit button
 , located on the upper right-hand side of your screen, to enable editing.
 - Edit your place details as desired by clicking/tapping into the fields and typing directly over the existing text or by choosing an alternative option from the your custom picklist in the Type field.
- To change the existing image, click/tap the Modify Image button.
Result: A browse window opens, where you can browse your way to a stored image. See the section above, "Adding or Changing a Place Image." - Click/tap the Save button to save your changes.
- [Optional] Add a floorplan to your place by following the steps under Creating Your Floor Plan.
Note: You cannot create a layout or diagram for a place that does not have at least one floorplan. Therefore, by default a 30' x 30' square plan is automatically created for each new place.
- Click or tap the Place Library sidebar option
 on the left-hand side of your screen.
Result: The Placez Library screen opens.
- Select the place you would like to delete.
Note: Search for the place name by typing the name of the desired place into the incremental Search field, located on the upper left-hand side of your screen. - Click/tap the purple Go To symbol
 , located on the right-hand side of the selected record.
Result: The Place Details screen displays. - Click/tap the Delete Place button
 , located on the upper right-hand side of your screen.
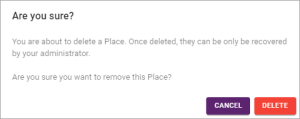
Result: A confirmation prompt appears.
- Click/tap Delete to delete the screen.
Result: The place is removed from your Placez Library.
See Also:
Adding Permanent Fixtures (Doors, Windows, Columns, etc.)
Selecting Paint and Flooring Options